-
Patio Pavers
By Material By Surface FinishThere are many types of natural stone available, so it is important to choose the right natural stone for you. Natural Paving's stone has been tested by a lab in the US and has far surpassed all ASTM requirements for paver material. Find out more...Tests include:
SI (Compressive Strength ASTM C140-15). The is the amount of pressure per square inch that may be applied before the stone breaks
Absorption Rate (ASTM C140-15). A low absorption rate is crucial to prevent stone holding onto water, especially in colder climates where high water content can result in the stone cracking
Coefficient of Friction Rate (ASTM C140-15). This is the slip resistance rating o the stone to ensure if is safe for use outside
Furthermore, all products from Natural Paving are CE marked to ensure they meet with strict EU regulations that were introduced in 2013. European standards EN1341 (flagstones), EN1342 (pavers) and EN1343 (kerbs) specify the requirements and test methods for each of these. The CE testing covers areas similar to ASTM including water absorbency, flexural strength and frost resistance.
All natural stone products have been tested to show the various properties of each stone and how it is likely to react under different circumstances.
-
Explore the Collections
Classicstone™ Collection
-
 Golden Fossil Natural sandstone with a light color blend of cream, buff, pink and gray with occasional fossil imprints
 -
 Harvest Natural sandstone with a warm blend of brown, camel and cooler gray contrasting tones
 -
 Promenade Natural sandstone in mainly light gray color tones with subtle mix of darker shades with occasional buff banding
 -
 Lakeland Natural sandstone with a selection of cool, understated tones of brown, khaki, lilac and gray
 -
 Graphite Natural sandstone with a selection of dark, charcoal gray tones accompanied by brown and buff swathes
 -
 Charcoal Natural limestone in a rich dark matt gray that gradually lightens in sunlight to a mix of mid-gray tones
 -
 Steel Blue Natural limestone in a cool blue-gray color mix with occasional copper banding
De Terra™ Collection-
 Harvest Path and driveway pavers in natural sandstone with a warm blend of brown, camel and cooler gray contrasting tones
 -
 Promenade Path and driveway pavers in natural sandstone in mainly light gray color tones with subtle mix of darker shades with occasional buff banding.
 -
 Lakeland Path and driveway pavers in natural sandstone with a selection of cool, understated tones of brown, khaki, lilac and gray.
 -
 Charcoal Driveway pavers in natural limestone in a rich dark matt gray that gradually lightens in sunlight to a mix of mid-gray tones.
 -
 Sahara Pathway pavers in natural limestone in buttermilk and matt gray shades with occasional burnt copper tones.
-
- Driveway Pavers
- Wall Blocks
- Pool Coping & Steps
- Features
- Inspiration Center Get Ideas and shop the look
- Sale
-
Change Country


You have no items in your shopping cart.


How do I install natural stone paving?
How to Install Natural Stone & Porcelain Paving
There are many methods available to you when installing natural stone and porcelain hardscape products. For each project, it is essential to utilize the best overall method to reflect the needs of each, individual project to take into account
- installer preference
- knowledge and experience
- site condiitons
- intended use
We have provided an overview of each of the usual methods below:
Installation Methods
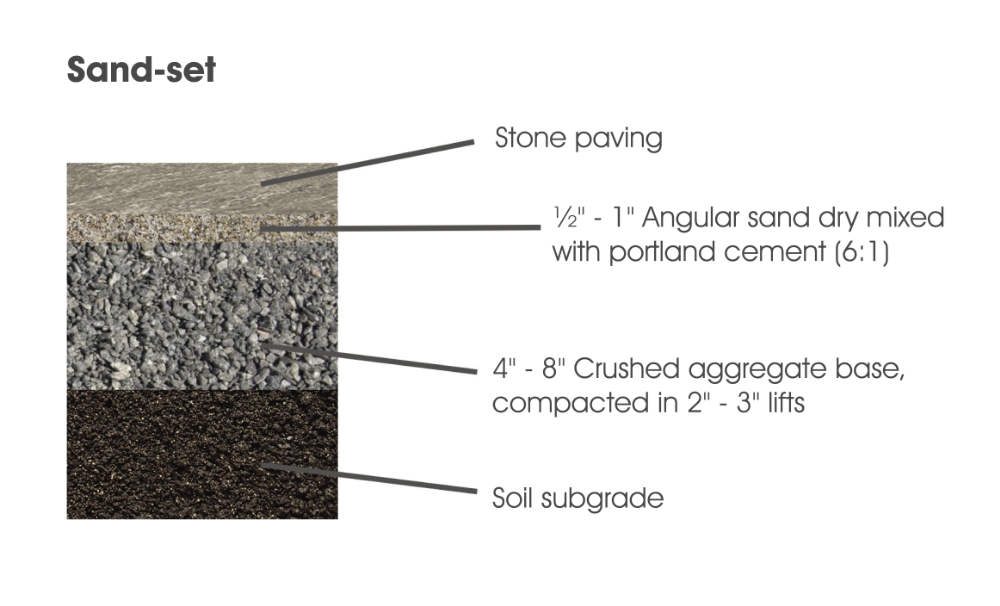
SandSet
This method is suitable for the following ranges:
- Classicstone(TM)
- Premiastone(TM)
- De Terra(TM) Pathway
- De Terra(TM) Driveway
- Vitripiazza (TM)
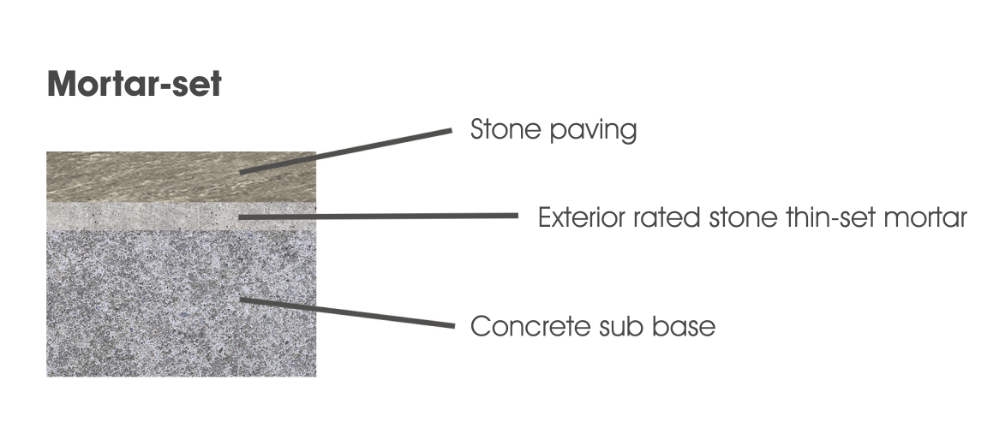
MortarSet
This method is suitable for the following ranges:
- Classicstone(TM)
- Premiastone(TM)
- De Terra(TM) Pathway
- De Terra(TM) Driveway
- Vitripiazza (TM)
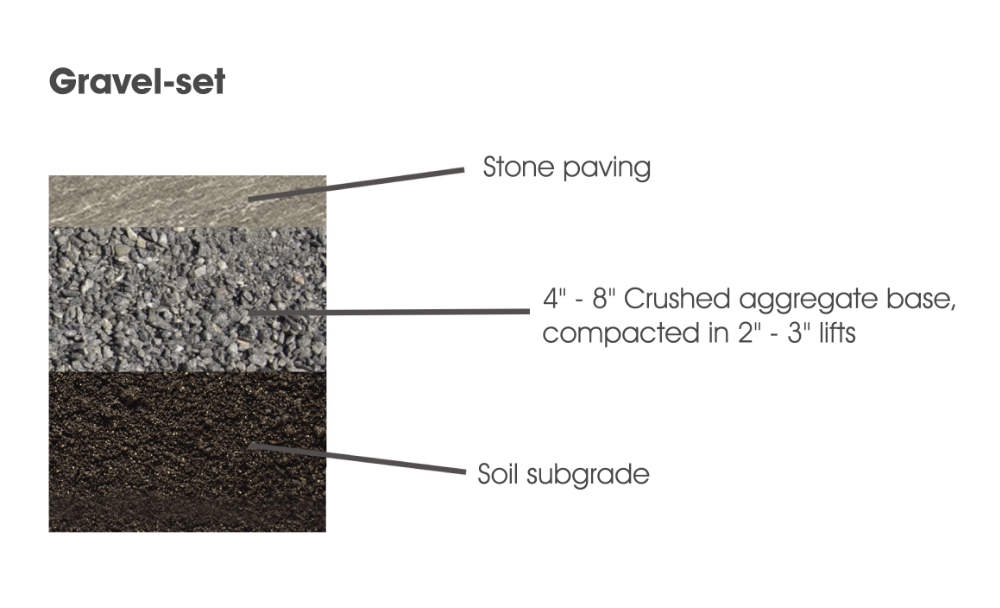
GravelSet
This method is suitable for the following ranges:
- Classicstone(TM)
- Premiastone(TM)
- De Terra(TM) Pathway
- De Terra(TM) Driveway
- Vitripiazza (TM)
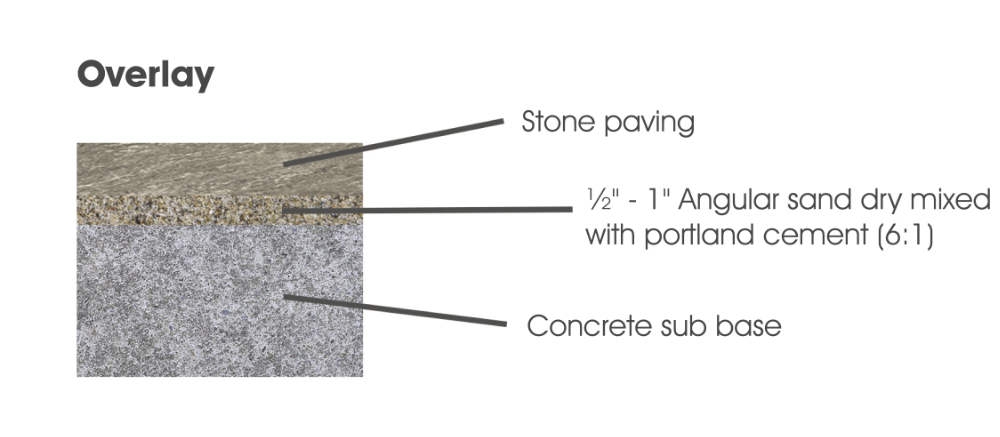
Overlay
This method is suitable for the following ranges:
- Classicstone(TM)
- Premiastone(TM)
- De Terra(TM) Pathway
- De Terra(TM) Driveway
- Vitripiazza (TM)
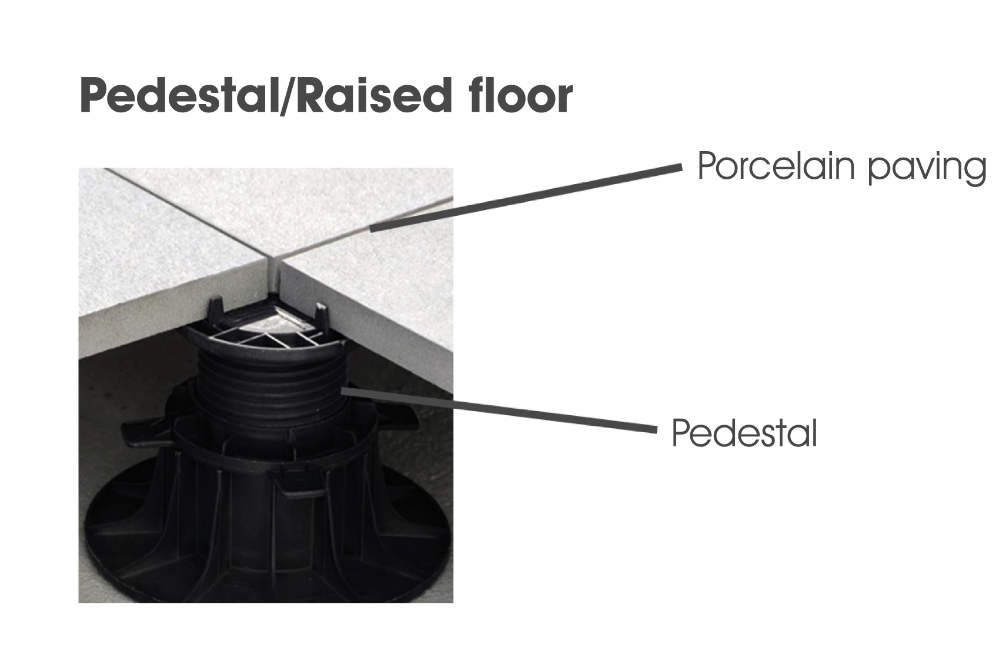
Pedestal/Raised floor
This method is suitable for the following ranges:
- Vitripiazza (TM)
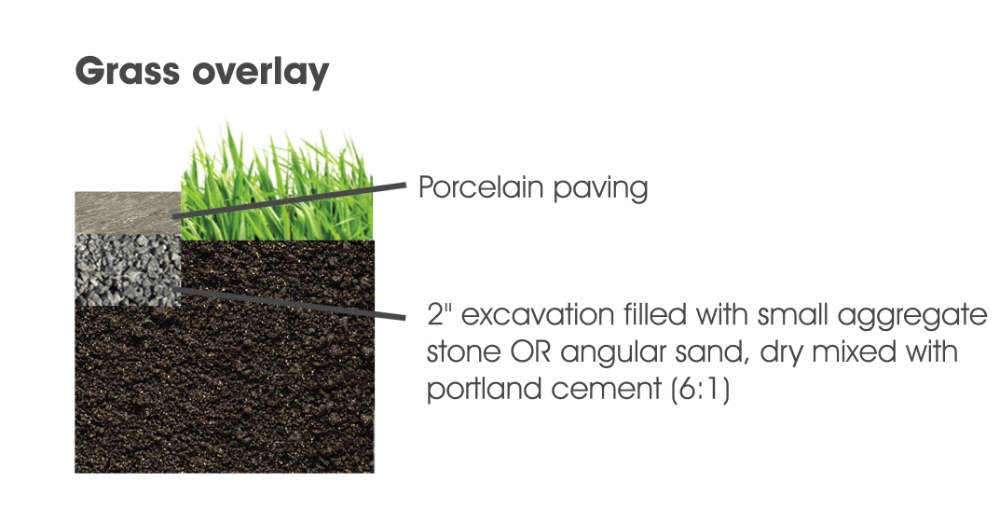
GrassOverlay
This method is suitable for the following ranges:
- Vitripiazza (TM)
Incorrect Laying Methods
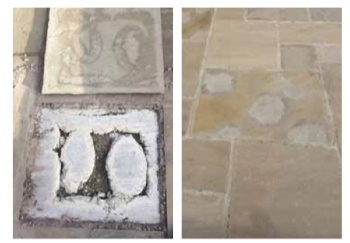
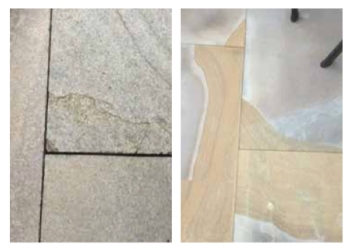
Spot Bedding
Spot bedding is where the installer leaves spaces beneath the flags, rather than laying the flagstone on a full mortar bed.
This method can lead to reflective staining, which appears as unsightly circular marks on the surface of the stone. The marks can appear days after installation or a few months after the paving has been laid.
We would always recommend laying a flagstone on a full mortar bed.
Once reflective staining occurs there isn’t much that can be done to reverse the effects, as it is due to the incorrect installation of the stone.
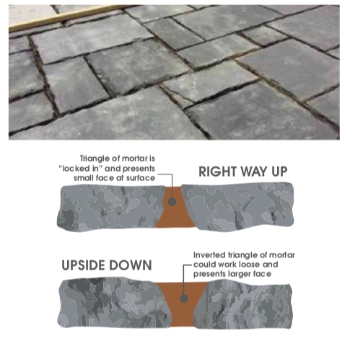
Installing Upside Down
When installing a flagstone, it is important to ensure it is laid the right way up.
When a piece of stone is selected at the source, it is analysed for it’s best side. Not only is the appearance considered but also the texture of the surface and edges.
This is taken into consideration as when it comes to laying the stone, the edges need be at the right angle to allow for a good joint, and if upside down, the result is usually unsightly larger joints.
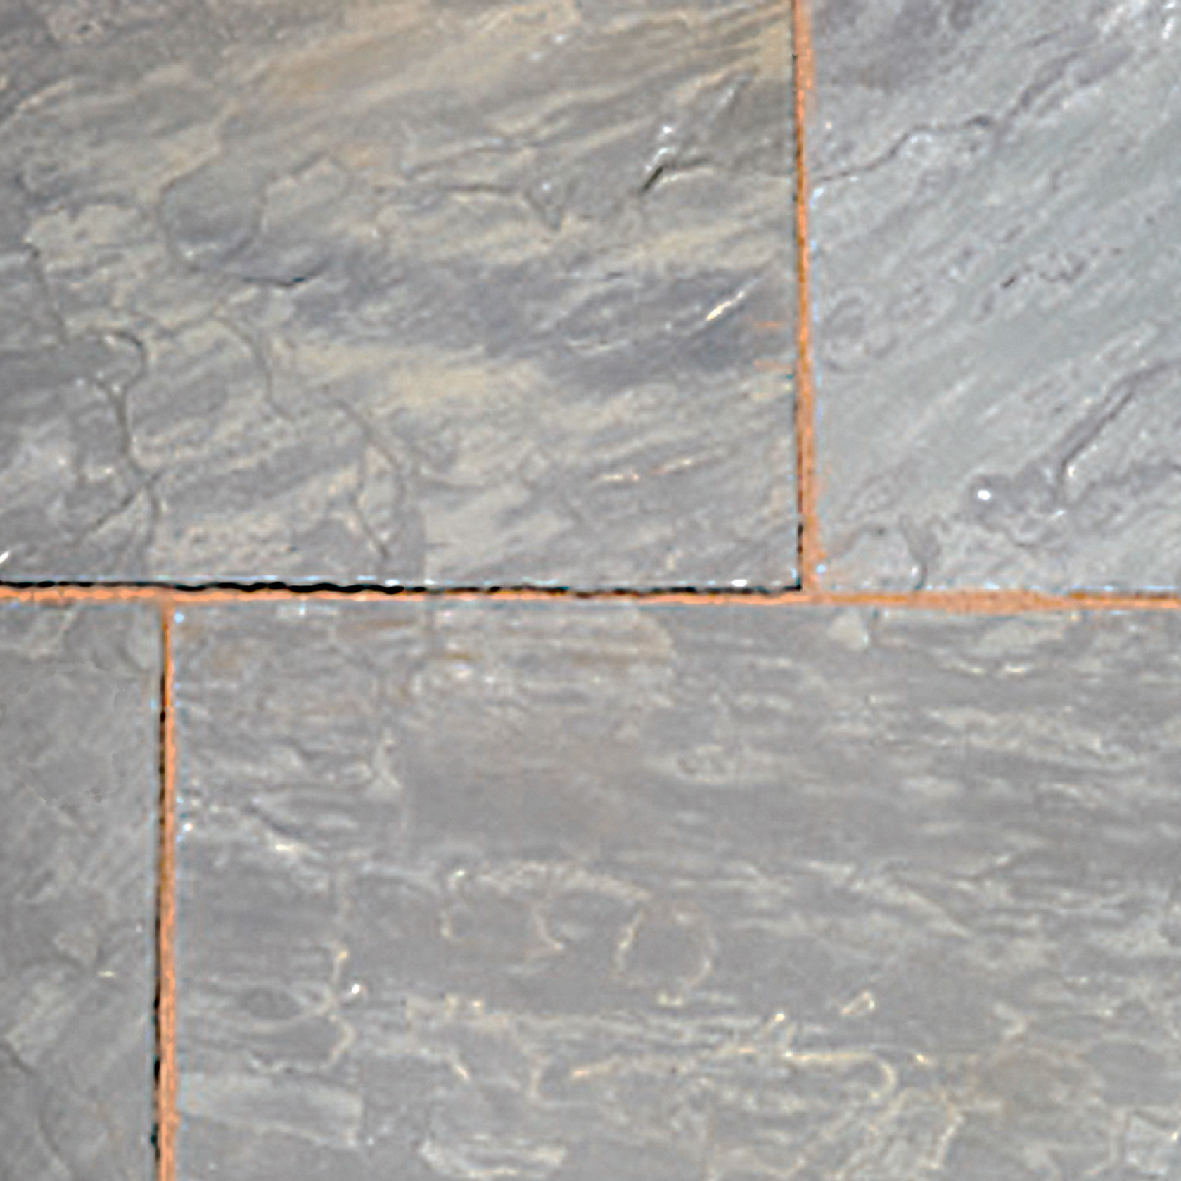
Butt Jointing
This occurs when no joint space is left between adjacent paving units, the stone is effectively ‘butted’ together and this can cause a number of issues once the stone is laid.
Spalling, where the stone starts to chip due to direct contact with surrounding paving units is often a result of butt jointing.
Butt jointing also promotes delamination of some types of stone. This is where the surface of the stone starts to chip and flake off. Although delamination can occur naturally, butt jointing encourages this occurrence.
We would recommend a joint width of 10-12mm between flagstones and 2-5mm between block paving.
Mixing from all Packs
When laying any type of paving, it is important to mix paving from a number of packs as it is laid.
Natural stone often varies in tone and texture, and so to achieve an attractive, blended finish where all hues and finishes are evenly distributed, and not clumped together in one or two areas, mixing paving from various packs is essential.
Obviously, it depends on the size of the project. When it’s a single pack job, randomise the paving within that one pack; on larger projects, mix from at least three packs if at all possible.
The more the paving is randomised before laying, the better will be its finished appearance.
Health and Safety
HEALTH AND SAFETY MUST BE ADHERED TO. A number of items within Natural Paving’s product range are heavy or awkward in shape to lift. We recommend that when moving pieces over 55lb, more than one person helps in completing the lift, or that suitable lifting equipment is used.
Furthermore we would also recommend that gloves are worn when handling our products. When cutting our products either with chisels or a rotary disk, it is essential that suitable eye protection is also worn. Always ensure that suitable respiratory protection is worn to avoid the inhalation of dust particle produced by high speed cutting devices.
Silica Dust
Silica dust is a natural substance found in most rocks, in varying amounts. The dust is generated from cutting and chiseling natural stone materials. Silica dust in some cases can cause serious health issues, therefore it is extremely important that when cutting and chiseling any natural stone products, adequate respiratory protection is worn.
It is your responsibility to ensure that you comply with all applicable health and safety legislation and guidelines.
For further information on Health & Safety, please visit our downloads section at www.naturalpaving.co.uk
It is your responsibility to ensure that you comply with all applicable health and safety legislation and guidelines.
If you are unsure how to lay paving using each of the methods above, then the following instructions provide advice on our preferred and recommended method:
Laying Flagstones
Part of its charm is that all natural stone varies in tone and texture, so ensure you have enough of the chosen product(s) on site to complete the project, as later batches may have slight differences in shade or finish.
- When laying, always randomly select and mix the product from several packs as this will minimise any risk of colour banding.
- Flagstones must always be laid on a “full bed” of sand and cement mortar that supports the whole flag, not just the corners.
- Use 6 parts of sharp sand or all-in ballast with 1 part cement. Mix together then add just enough water to make a mortar that binds to a sticky consistency: a good guide is that there should be sufficient water to allow the mix to be moulded into a ball without falling apart, but not so much that water would run out of it were it to be squeezed in the hand. A plasticiser added to the mortar during mixing will improve workability.
- To improve adhesion, consideration should be given to applying a slurry primer or a paste of SBR with cement to the underside of the flagstones prior to bedding.
Plan ahead!
Think about where it would be best to start laying, and set-up lines and levels to guide the laying process. Think about how the paving will be drained.
- Spread a layer of bedding mix that is roughly 50mm thick and slightly larger than the base of the flagstone being laid. Place the first flagstone onto this bed and use a rubber mallet to carefully tap it down until it is at the correct level.
- Repeat the process with the next flagstone, adjacent to that just laid, leaving a joint width of 10-12mm, and again, tap down to level. Repeat this process, laying one flagstone at a time until the whole area is covered.
- The joints of flagstone paving look best when pointed with a mortar. Make a pointing mortar by mixing 4 parts of soft or building sand with 1 part cement. Again, add as little water as possible to bind the mortar without over wetting it, and use a plasticiser as directed. Use a small pointing trowel to feed the pointing mortar into empty joints from the edge of a larger trowel and then use a pointing bar to press it down firmly and to polish it when the joint is full.
- Brush off any excess mortar from the stone before it dries taking care not to stain the surface.
- Keep off the new patio for the first 24-36 hours, by which time the initial set of the mortars should be complete. After 3-7 days, the patio should be fine for full use.
Natural Stone Block Paving
All block paving, whether it’s a patio, a pathway, a terrace or a driveway requires at least three layers: a sub-base to give it strength; a laying course of sharp sand to support the blocks; and the paving blocks themselves. It also needs to have firm edges to hold the paving securely in place, and the right kind of jointing to fill the gaps.
- The sub-base should be at least 150mm deep for driveways and 100mm for paths, patios and other areas with no vehicular access. The laying course should be approximately 25-40mm in thickness when compacted. Take into account the thickness of the blocks being used plus the need to remain at least 150m below the Damp Proof Course (DPC) of any adjacent building when calculating the depth of excavation required: 150mm below DPC + Thickness of block + 25-40mm bed + 100-150mm sub-base
- Set up taut string lines as necessary to act as guides to alignment and levels. Think about how the paving will drain; slope towards open areas of garden or drainage collection points such as linear channels or gullies.
- When constructing the restraining edge courses, mix concrete for the bed and haunch using 6 parts all-in ballast with 1 part cement, or 4 parts 10mm gravel with 2 parts sharp sand and 1 part cement. Add just enough water to bind together the dry ingredients. Place the edge course units onto a bed of concrete approximately 100-125mm deep and tap down to level using a rubber mallet.
- Level out the sub-base material (often referred to as Type 1 or MoT1) to create a finished profile which matches that intended for the paving. It’s vital that the next layer, referred to as the laying course or bed, has a regular, uniform thickness, so the sub-base needs to be accurate to around ±10mm. Check the level and add or remove material as necessary to create a reasonably accurate profile.
- The laying course is formed by ‘screeding’ the slightly-damp sharp sand to the required level. Building, soft, plastering or masonry sand is not suitable as it may cause the finished paving to settle or stain.
- Relying on the edge courses or string lines as level guides, spread and level a layer of sharp sand roughly 50-55mm thick.
- Pass over the sand once or twice with a vibrating plate compactor to partially compact. Use a length of straight timber to scrape off the top of the sand layer, reducing its level in the process and creating a smooth, even surface, approximately 25-40mm thick, on which to lay the paving blocks.
- Tidy up and smooth off the levelled-out sand using trowels so that an even, regular surface is created. The finished profile of the sand bed will be the same as the finished profile of the paving, so take time to get it right. The finished screed should leave the blocks 5-8mm high so they can be compacted downwards when laid.
- Never walk on the screeded laying course before it is covered by the paving blocks. Always work ‘uphill’, and choose
- a starting point that is a straight edge or a right-angle corner. As natural stone varies in tone and texture, ensure there is enough of the chosen paving on site to complete the project, and always randomly mix the paving from several packs during installation. This will minimise the risk of colour bands or groups of identically toned paving appearing within the paved area.
- Place each block carefully onto the laying course. To avoid spalling and/or chipping of the blocks, a gap of 2-5mm is required (roughly the thickness of a trowel blade). Try to place the blocks straight down onto the bed so that bed sand isn’t trapped in the joints.
- Once blocks have been laid, they can be walked upon with care, but other than the person laying the blocks, try to keep everyone else at least one metre back from the leading edge.
- Lay all the full blocks first. Blocks to fill any gaps at the edges or around drainage fittings can be cut to size using a hired-in block splitter or disc cutter fitted with dust suppression equipment. Avoid very small cuts that are less than one-third the size of a full block. Instead, cut two blocks, each being more than half a block, and use these to fill the gap.
- Once cutting-in is completed, check the area for any damaged blocks and replace them before undertaking the jointing, as unjointed blocks are much easier to remove than ones that have had the joints filled with the sand.
- The joints between adjacent blocks are filled (jointed) by sweeping a selected kiln-dried sand over the surface to fill them completely. A vibrating plate compactor is then used to travel across the paving in several directions, compacting down the blocks and settling the jointing sand. Once completed, some joints may need topping-up with extra sand.
- Check the jointing sand again in 4-6 weeks’ time as it may have settled further. Fully topped-up joints will ensure the paving gives you many years of reliable service.
Prefer to type? Our great live chat service means we can offer you all the expert help you need without needing to call!